In the previous article, Keys to Signs & Feedback, we talk about the theory behind S&F, as well as the 7 categories you need to consider when designing a new feature.
Now, a whole bunch of theory is always very good to have in mind but can be difficult to apply to our everyday needs. Over the years, I have developed quite a bunch of handy little design tools to help me design, focus, and iterate on different design topics. And I’d like to share them with you!
So let’s start with a tool to help you design proper signs & feedback systems. It’s a very simple tool, a simple Excel table combined with a methodology, but it helped me tremendously over the years.
First, let’s talk about the purpose of such a tool. My goals with it are the following:
- Identify every feature and gameplay states that need to be properly signed and feedbacked.
- Force us to consider all the available S&F categories, and not fall into the UI-only treacherous pit.
- Create a sharing document to communicate better with our teams and give tangible material for iteration and problem-fixing.
- Have a centralized place for S&F production tracking and prioritization.
S&F Tool & Methodology
The Excel table that is the base of our tool can be found here:

Download it, modify it, put your logo wherever… It’s yours (but consider giving credit, it’s always appreciated))!
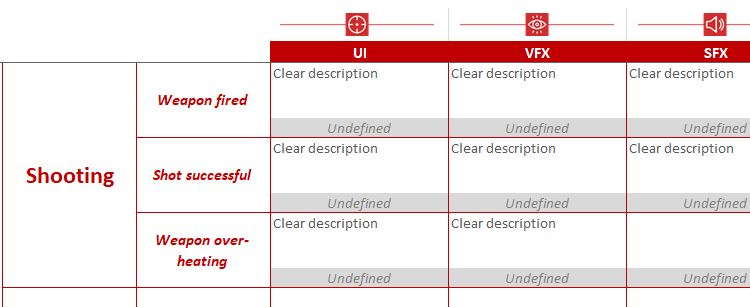
Now, let’s describe this tool a bit. Each column of this table represents one of the seven categories of S&F that we identified in the previous article (i.e. if you have specialized teams, each of them can have an instant overview of all their work in one unique column).
Each line is a specific moment in the gameplay. It identifies first the global feature (like “Navigation”, “Shooting”, “Environmental Interaction” etc.) and then breaks it down into each of its components. Let’s take an example: for a 1st-person shooting feature, its sub-parts could contain “Shooting an enemy”, “Aiming at an enemy”, “Aiming at an ally”, “Reloading”, “Empty clip (reload needed)”, “No bullets”, “Shot missed”, “Weapon over-heated” etc.
Now you may argue that some are Signs while others are Feedback, that all the reload states could be a category of their own, or that the different aiming possibilities could be regrouped in a single one… Fair enough! Organize the document the way you feel reflects best your vision and the different components of your game.
Step #1: List all your features, as well as every single state of each of them, be thorough.
Now that you have your entire game/feature broken down (depending on if you use one document per feature or just a master one for your game) it is time to think carefully of the potential use of each S&F category for each state you have.
THIS IS A VERY IMPORTANT STEP! As discussed in our previous article, doubling, and tripling every S&F is very important, and most of the time we forget to challenge our first perception (or turn straight to UI). Taking your list line by line, and every time asking you “Could I add something from the XXX category” will actually open doors you never considered before!
At this stage, it’s better to overfill this table than the opposite.
Step #2: Challenge every cell, every category on each line. If relevant, detail precisely the end result you have in mind.
>> Warning: Describe every cell as precisely as possible! <<
“Dying sound”, “Flashy SFX”, “Cool animation” never gave any kind of vision. You want to be crystal clear on your vision here, your team will thank you for that! Good examples: “Circular green poisonous AOE expanding from the enemy, slow-down and fades as it travels, vanishes at approx 10m radius”, or “Impact sound of the bullet on concrete-like material, followed by dust particles falling on the ground”. From there, an Audio Designer or VFX Artist can project on your needs, and propose something even better!

Alright! We are getting there! We now have a full list of features broken down in states and for each of these states a full study of what will be needed from every possible angle! We only have one extra step to do before calling it a day for a V0: Prioritize.
Now that you have the big picture of your system, you can judge the importance of each of these elements in relation and in combination with each other!
Personally, I only use 3 categories:
- Critical: a mandatory S&F, either key in the player’s understanding or playing a critical role in his perception of the feature (like a camera flick while firing a rocket launcher)
- Nice-to-have: A nice addition that players will appreciate, that will strengthen the feature and its understanding while not being a game-breaker if not present (like a green, foamy, UI framing of the screen while the player is poisoned)
- Polish: the details that will get you the 90+ on Metacritic 😉 definitely for the end of production if everything urgent has been done.

Step #3: Prioritize each cell based on its role in the player understanding of your feature and its emotional/immersive potential.
This categorization is very specific to each game. Take your time while deciding on it. Doing so may highlight production bottlenecks, like how critical the job of your VFX artists will be (or the fact that you are clearly lacking an experienced animator!)
Congrats! You now have a beautiful battle plan! You’re now ready for the last part…
Implement, Test, Iterate
You will all agree that this is a critical step in everything we do: however talented or experienced we are, everything we do can fall apart once given to our players. We will realize that our players don’t understand our stamina system, or can’t tell if they hit this boss or not, or just cannot time a jump properly!
Well, this is one of the big advantages of having this kind of document! You will be able to precisely pinpoint which features and states are affected and iterate on every cell of their lines! This document isn’t a one-off, it follows you through your entire development and helps you design in a smarter, more efficient way.
Step #4: Implement your Critical S&F, playtest your game, and iterate on your system!
Conclusion
I have used variations of this tool during at least 4 AAA productions and it always brought results: we had a full vision, teams could talk over tangible things, communication was flowing better, and production could prioritize more efficiently…
If you give this tool a try, feel free to break it apart and make your own version! On some of my projects, I built this document myself, while on some others we involved all the teams in its creation. On 2 specific projects, we added a Jira field to each cell to also track their implementation… It’s a very versatile tool!
Feel free to come and debate this approach on our Discord (channel #signs-feedback) or send me your own tables (should you want feedback or show the world how glorious your system is!)
Did you enjoy this article? If so, please consider supporting GDKeys on Patreon. It helps keep this place free of ads and paywalls, ensures we can keep delivering high-quality content, and gives you access to our private Discord where designers worldwide gather to discuss design and help each other on their projects.

1 Pingback